How to start a vegetable garden (Vegetable gardening for beginners) – Growing veg for beginners
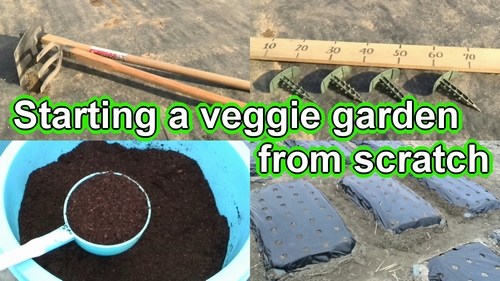
Growing vegetables in chemical free cultivation. How to start an organic vegetable garden? This time, we’ll explain how to prepare fields and raised beds. (Vegetable gardening for beginners.)
The method of preparing fields and soil doesn’t change much, even if the vegetables you’re growing are different. (However, the fertilizer may vary slightly depending on the type of vegetables.)
So, if you learn the basics of starting a vegetable garden and setting up rows, you can apply them when cultivating various vegetables. I believe it will be useful even as a guide on “How to start a vegetable garden in your backyard." so I hope you give it a read.
Even beginners like me, who have never used farming tools before, were able to do it. So, if you’re a beginner in home gardening, please give it a try.
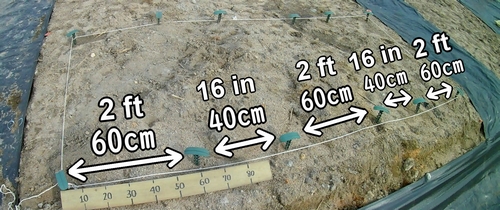
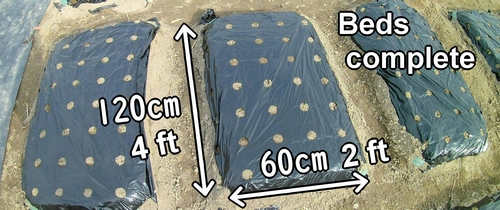
This time, we’ll create 3 beds in a plot measuring 1.6m x 3m (5’3″ x 10′). 3 beds of 120cm x 60cm (4 ft × 2 ft) each.
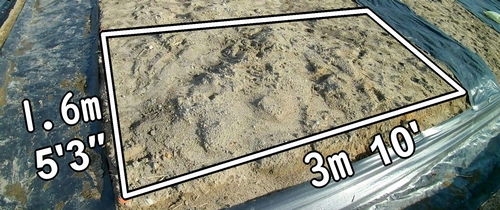
3 beds are quite large, so if you’re starting a vegetable garden in the backyard, it might be a good idea to start with just 1 bed “120 x 60cm" (4 ft × 2 ft) first.
For those who are beginners in home gardening and lack confidence, it’s okay to start with half a bed, which is 60cm x 60cm (2 ft × 2 ft).
Even with half a bed, you can grow vegetables like cherry tomatoes, eggplants, bell peppers, etc, enough for one plant. If they grow well, you can harvest a lot.
To plow the soil (How to start a vegetable garden:Part 1)
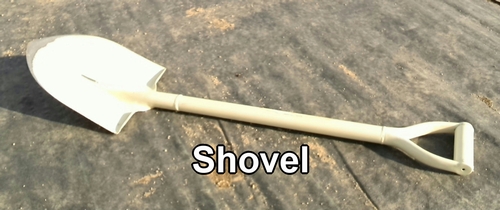
From here, we will explain how to set up a vegetable garden. First, let’s start with the soil preparation. If the soil in the field is hard and compacted, vegetables won’t grow well. Therefore, we use a hoe or shovel to plow the soil.

Like me, if you’ve never used farming tools before, you might find a hoe challenging to handle, so a shovel might be better. If the soil is hard, it might become a bit easier to plow after watering it.
The depth to dig is approximately 20cm (8 inches). If you need to dig hard soil deeply, a shovel is more suitable than a hoe.
Remove stones and roots that come up while plowing the soil. Leaving them can make it difficult for vegetables to develop roots.

Preparing to create beds (How to make a vegetable garden:Part 2)
The farm I’m renting is divided for each user, so I included this step. However, if you’re gardening in the backyard or have unlimited space, this step may not be necessary.
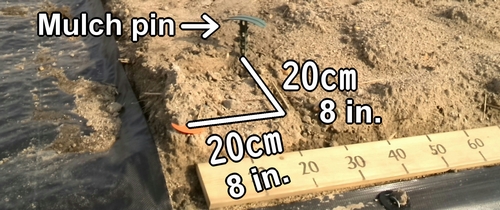
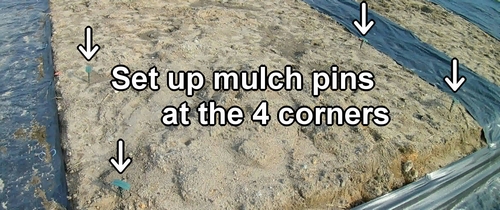
Measure 20cm x 20cm (8 in. x 8 in.) with a marked wooden board and set up mulch pin at the edge of the row. (This serves as the marker for the very end of the row.)
String a twine on the mulch pins. (As a guide to measure the length.)
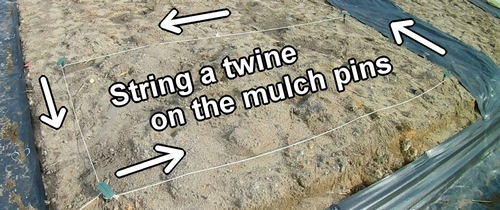
Measure the spacing with a wooden board along this twine and set up mulch pins at the positions where the rows will be.
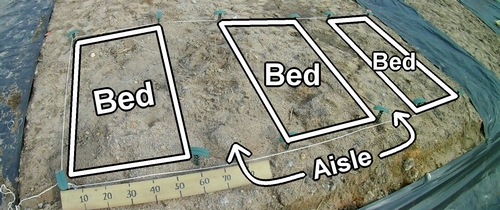
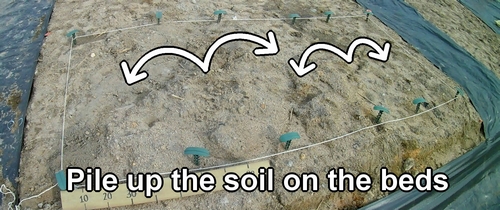
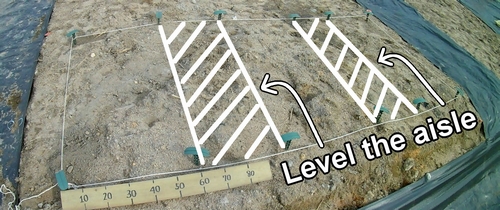
Pile up the soil from the aisle onto the rows to raise their height. (Keep the aisle area flat.) Creating the shape of the beds at this stage makes the later steps easier.
Mixing soil and fertilizer (How to start a veggie garden:Part 3)
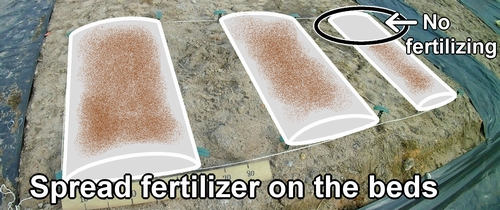
After leveling the piled soil a bit, spread fertilizer on top of the soil. Fertilizer is a crucial part of starting a vegetable garden. If there is too much fertilizer, pests are more likely to be attracted, and the taste of the vegetables may become bitter.
Too little fertilizer is also a problem. Nutrient deficiency can prevent stems and leaves from growing large, leading to a decrease in harvest. In farming, the basic idea of fertilizing is to apply the necessary amount at the right time in a balanced manner.
All the vegetables in this garden are grown through pesticide-free organic farming, so we use only organic fertilizers.
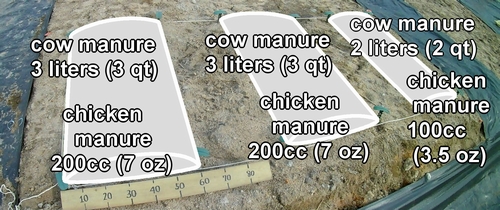
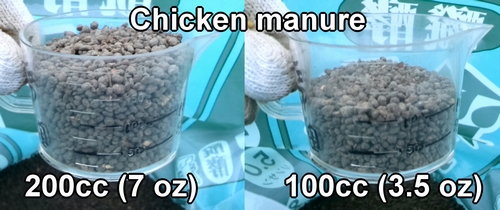
The fertilizer quantities are as follows: For each of the two beds, 3 liters (3 qt) of cow manure and 200cc (7 oz) of chicken manure. For the remaining bed, the mixture is 2 liters (2 qt) of cow manure and 100cc (3.5 oz) of chicken manure.
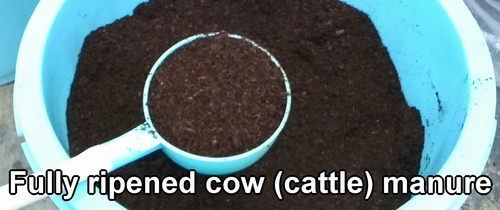
This is cow manure (fully ripened). Cow manure is often used more as a “soil conditioner" to improve soil drainage and aeration rather than as fertilizer.
This is chicken manure. Chicken manure contains a balanced mix of nutrients such as nitrogen, phosphorus, potassium, and lime, essential for vegetable cultivation. It is also used as organic fertilizer during additional fertilizing.
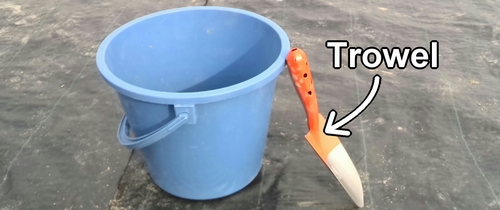
Cow manure and chicken manure are mixed in a bucket before spreading on the beds. (Using a trowel makes mixing easier.)
After thoroughly mixing the fertilizer in the bucket, spread it on the beds.
The fertilizer added before sowing seeds or transplanting seedlings is called “base fertilizer". The composition of the base fertilizer varies slightly depending on the vegetables being grown, soil conditions, and the weather of the year. In addition to the cow manure and chicken manure used this time, there is also canola cake as another organic fertilizer.
As a general guideline for base fertilizer, for crops like tomatoes, eggplants, and bell peppers, a common mixture is 1 liter (1 qt) of cow manure and 50cc (1.8 oz) of chicken manure in a 60cm x 60cm (2 feet x 2 feet) plot.
For leafy vegetables like red leaf lettuce, shungiku, and mizuna, a common mixture per plot is 1 liter (1 qt) of cow manure and 100cc (3.5 oz) of canola cake. (If the plot size doubles to 60cm x 120cm (2 feet x 4 feet), the fertilizer amount is also doubled.)
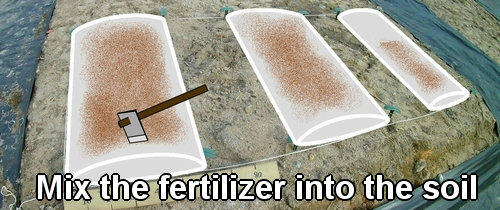
When mixing fertilizer and soil, swing the hoe down and lift it naturally. Repeating this motion gradually blends the fertilizer and soil. The key is not to force the mixing.
Shape the beds and mulch (How to start growing vegetables:Part 4)
The final step in creating a vegetable garden is the bed formation. Digging up the soil, mixing fertilizer, and other tasks make gardening a physically demanding process, but it’s the final push from here. Let’s create tidy beds and prepare for sowing seeds or planting seedlings.
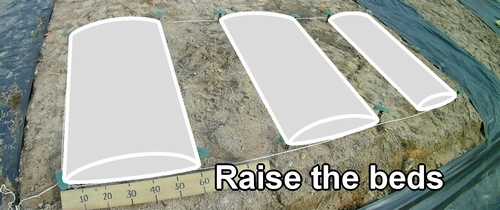
Use a wooden board to flatten the top and sides of the beds to shape them evenly. The best shape for beds is a neat trapezoid. If the top of the beds is uneven, it’s not good as water, including rainwater, tends to accumulate.

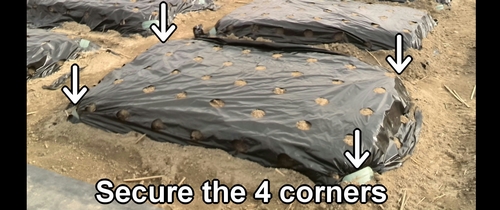
After shaping the beds, cover them with perforated black mulch and secure it with mulch pins. This time, we used perforated mulch because we decided to sow leafy vegetables, but if planting seedlings, non-perforated mulch is used.
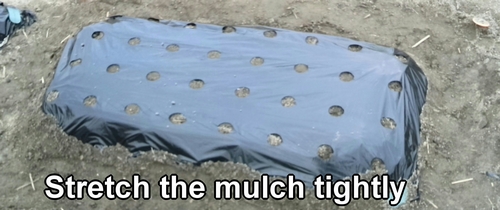
Ensure that the mulch is taut. If it sags, rainwater may accumulate, and the effectiveness of the mulch will not be fully realized.
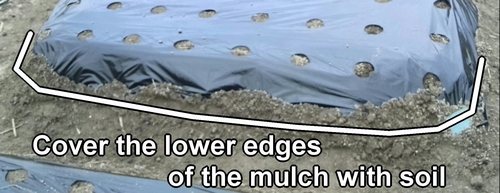
The lower edges of the mulch are covered with soil to prevent them from flipping in the wind.
With this, the beds are set up. Wait for about two weeks to let the soil and fertilizer blend, and then it’s time for sowing seeds. Organic fertilizers like cow manure and chicken manure are absorbed by vegetables through the breakdown process by soil microorganisms. The decomposition period is approximately 2-3 weeks. In winter, it decomposes more slowly, taking about a month.
Following is the video for how-to. English subtitles are available.